Friday, October 28, 2016

TAKING A SHOT AT THE SIX SHOT SYSTEM


Close Up of Hands-
When taking a close up of hands the only thing in the frame/picture is the subjects hands and what the hands are doing. 

Close Up of Face-
Taking a close up of the face is when all you see is the face, this allows the viewer to see the emotion of the subject. You want to try not get shoulders in or cut off the head but sometimes thats hard depending how the subject is positioned. 


Over the Shoulder-
An over the shoulder shot is from over the shoulder the shoulder and show what the subject is looking at and/or working on. The shot should include some of the shoulder and head.


Medium Shot- 
A medium shot is from the waist up of the subject. This kind of shot is to establish what the subject is doing and/or working on.


Wide Shot-
A wide shot has the subjects whole body is the frame. This gives the viewer more information about the environment and what the subject is doing and looking at. 


Extreme Wide Shot- 
This shot is used to show the environment the subject is in and how the subject interacts with environment.

Tuesday, October 25, 2016

SNAP, TWEET, SHARE, POST


I Would Accept/Hire You, But...

What you post online could destroy your future. Colleges and businesses have gotten smart and have started checking the social media of applicants. They do this to see how you present yourself outside of a professional situation, like an interview or the work place. Looking at peoples social medias also allows them to see how you treat others, your personality, and your views and beliefs. However, while there are some good aspects to this, there are also some bad ones, especially for the younger generation. Teenagers are not aware of the impact the posts and tweets they share can have on their life's and don't think them through. If a college or employer saw these posts that the teenager did not think through, there is a chance that they would be denied the job or acceptance into the school. While social media is fun to have and helps us stay connected with friends and family we still need to be careful about what we post, especially since nothing disappears from the internet, even if you delete it from your profile.

Keeping My Future Bright

Being a teenager in this tech savvy world means that I have social media. I of course post on them but before I do I always put myself the place of an employer that is looking at my profile na thinking if I would like to see that. Now, I never have anything bad to post seeing as how the only pictures I have are with friends, but still, I always think my post through. Keeping your post appropriate is only one step though. Another step I take to make my social medias acceptable is that I do not follow people that post inappropriate content or disrespectful comments. This shows schools and employers that I surround myself with good people and that I don't have any negative influences. Social media takes a big part in peoples lives now a days, especially teenagers, but I will not let it ruin my chances at a good future by posting with out thinking.

Tuesday, October 18, 2016

HIRE ME

This quarter I am no longer in animation, instead I am in video. To start off the class we are working on elevator pitch. An elevator pitch is used to make people interested in hiring you. Below is my elevator pitch.


I'm a member of the e-Communication program at ONW. My talents consist of playing sports, writing, making videos, photography, and organization. Many people compliment me on my writing and the organization of my writing. The skills I have are the organization of my paragraphs, framing shots in videos and pictures, and the creativity of my pictures. I really enjoy doing the things I'm good at and I'm motivated by the idea of having a beautiful finished project.


Thursday, October 13, 2016

HOUSE ANIMATION: COMING AT YOU

New Experiences 

My last animation project was a 3D animation of a house. Through this project I used a program called Sketchup. As I created this program I learned a lot about 3D modeling and Sketchup. I learned the tools push, pull, follow me, and many more. As I used these tools I also learned techniques to making 3D animations. I learned how to make a roof, which was very difficult, doors, windows and much more. I made the foundation of the house by making a rectangle the size I wanted the house to be, then I used the push, pull tool to make it 3D. Then, to make the garage and other cut outs, I drew the shape that I wanted to cut out, then selected the area I wanted to cut out and deleted it. I also learned about the principles of light and shadows. Lights and shadows are used to enhance the animation, make it look more life like, and to bring out details in the animation. after i pit the lights and shadows in I animated the camera to show all angle son the house. overall, this was the easiest part. To animate the camera all you do is place it where you want a frame to be and then press add to create the frame. I also learned about myself, that i shouldn't stress and pick projects I know I can do and do it well. Over all the projects this one was my favorite.

Monday, October 3, 2016

THIS IS REAL, THIS IS ME

The Path I Followed

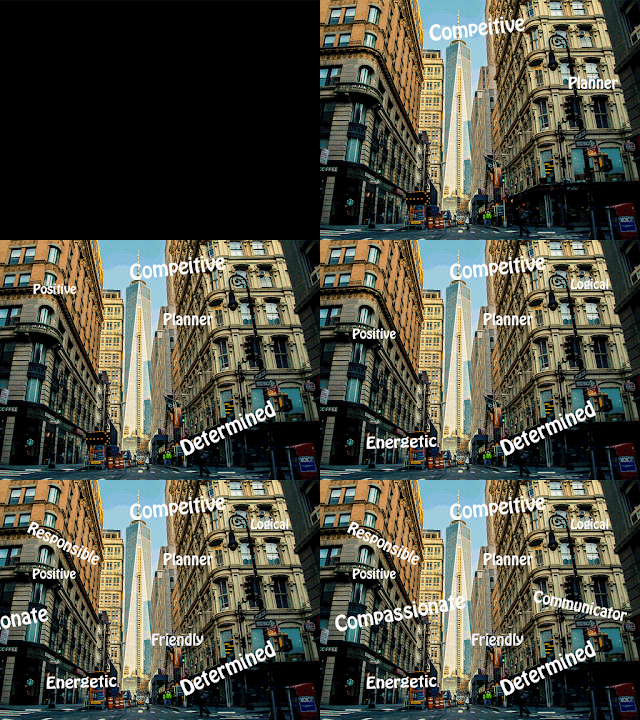
This animation was different from my two previous ones. The biggest difference, that you probably have already noticed, is that I animated words instead of a ball. Since I was animating something different I had to follow some different steps. I first had to start out by finding a picture to set as my background, I chose a picture of New York City since that is my favorite city and I would love to go to college there. Once I had my picture, I saved it to my computer.Then I put the picture into my photoshop file as the background. After the picture was set I started typing the words into my project. Each word was typed into the their own layer so I could animate them separately. Once all the words were typed I had to pick the font and color of the words. At first I wanted my words to be in the font Comic Sans which some of my classmates made fun of since, I guess, its not a good font. After some thought I changed the font to something that wasn't Comic Sans. I chose the color white since that was the only color that would show up on the picture. After I had the words all set up and ready to go it was time to animate. To animate the words I used a video timeline instead of a frame by frame timeline like I used for the pervious animations. In this timeline all I did was change the length of each word to how long I wanted them in the animation, adding the fades to the end of each one. I also used transforms to bring the words into frame from off screen. This was done by setting the words at an ending point then dragging them to where I wanted them to start. When the animation was played the words moved from off screen to on screen due to the use of transforms. This project was really fun since I could express myself will animating.


New Information

As this project went on I learned a lot about animation and myself. Before we started animating we had to come up with a list of ten strengths we have. As I was writing the list I realized I had a lot more strength's than I thought and some characteristics I have a never viewed as a strength until now. Once I started working on the actually animation I learned a lot about animating. I first learned how to but a picture into Photoshop while still being able to edit it. Once I learned about the picture I learned how to use a video timeline and animate words. I also learned that I really enjoy using words and text in my animations and seeing them move. Throughout this whole project I wasn't only learning about animation but also about myself.


Lessons To Take With Me

This project gave me lots of information I can take with me to use in life and my animations. The first take away is to never underestimate myself. As I was writing down my ten strengths I realized how I was limiting myself in what I could do since I never stopped to think about all my strengths and figured out how to use them to my best ability. I will now push myself even harder and use all my strengths in life and any project I work on.The lessons about animating that I will always remember are not to use Comic Sans, how to use a video timeline and how to make a picture appealing to look at. These lessons will forever be with me through life.


(P.S. the title of this blog post is a reference to an old Disney song for the movie Camp Rock. Here's a link to a video of the song, excuse the Spanish dialogue, https://www.youtube.com/watch?v=an6owIsT9gw)

Thursday, September 22, 2016

BOUNCING ALONG

The Journey Begins

This project might only be my second of the but this was the hardest so far. To start out I put in the sky and ground layers like in the previous animation. After that I made two ball layers that were the same size, the only difference is that one would have a regular smiley face and one would have a squashed face. The faces on the ball were made by first making a separate layer for each face then drawing the face on those layers. Once I drew the faces I merged the layers that had the face on them with the layer with the ball, I did this for both balls. After that was done I made another layer that would be used for drawing the arcs the ball would follow. This is simply done with the paintbrush tool and a few tries. Once the arcs were drawn, I started animating the bouncing ball. To the animate the bouncing I needed a lot of layers which will eventually be turned into individual frames. For each layer the ball moves a little further each time. When the ball starts falling toward the ground I stretch it to give the effect of gravity. Then when the ball hits the ground I change the ball from the normal happy face to the squashed face. Once I have the squashed faced ball the ball was squashed to show impact. After the ball has hit the ground and is bouncing back up the ball is still squashed face and begins to stretch and curve toward the other way.  I then switch the face back to the normal smiley face. I repeated this until the ball stopped bouncing. Once I had all the layers, I transferred them into the timeline which is what helps create the animation. I then added a color fade at the beginning and end, made a few fix's, and done, my animation. 


Obtained Knowledge 

Throughout this project I have learned many things. The first item has to do with animation. I learned how to create a fade in between frames, how to merge two frames together and I learned about arcs and the movement objects take in arcs. If you would like to learn more about arcs I will put a video below. I also learned a lot about topics that aren't directly related to animation. I learned how to take my time and go through all of the details to make sure everything turns out the way I want. I also learned that its okay if the project dosen't goes as planned, and just to enjoy what I'm doing and have fun while doing it. All of the topics I learned during this animation will stay with me and help me in day to day life. The animation will not help in everyday life as much as the other lessons but you never know. 

In The Near Future

As this year goes on and I continue to do more animations there are some things that I will do differently. One thing that I will do differently than this time is that I won't add as many frames as I did. Adding to many frames caused the animation to be quiet slow and not look as smooth. To keep the animation looking nice and fluid I will add less frames. Another part of the project that I will do differently next time is how the ball turns and bounces. In this newest animation, the balls movement does not seem realistic and makes the bouncing look strange. To keep the bouncing looking crisp I will watch how the ball bounces more closely. These are items that I will think about during my next project. 


Watch this video to learn more about arcs:


Thursday, September 8, 2016

MY FIRST TASTE OF ANIMATION

In The Beginning... 


This past week in e-Comm we started and completed our first actual animation project. The project was to make a ball bounce using Photoshop. Now I know that doesn't sound like the most interesting thing to do but when you are actually going through the steps and making it happen, its really exciting. First off we started learning about squash and stretch which gives the ball a more exaggerated movement as it falls and moves back up. Then we created frames of the ball. Each frame had the ball a little lower and becoming longer and narrower to give the effect of gravity. After we had all of our frames we put all of them in a timeline which enables the frames to move giving the ball the movement of falling and bouncing. Once you put all the frames in the timeline you copy all of them and reverse them so the ball bounced back up. After you did that you set the amount of the loops the video takes to forever, this will keep the video going no matter what. If you want you can a sky and ground by adding another layer for each of them.  This is the process, as I went through all the steps a learned a lot. 


 Lessons Learned

When I given this animation assignment I knew it would be fun but I didn't know I would learn as much as I did. I started out by learning about two rules of animation. The first one was ease in and ease out. This is the steady acceleration or deceleration of an object to give it a realistic movement. the other rule I learned was the previously mentioned squash and stretch. Since I all ready went over that I won't again. The other thing I learned about  is frame by frame animation, which was the coolest thing to learn about. Through these learns I have also learned about what I would do differently next time. 


Tomorrow 

Even though the final animation turned out really well and I'm very proud of it the next time I work on an animation there are somethings I would do differently. The first change I would make is not messing around with the tools on the application. I wouldn't do this again since when I messed around with the shape tool there was a white background that made my animation really same. Not only was there a white background but I also lost time I could've been using to improve my animation instead of making it worse. Other than that this animation was a learning experience.